Thursday, April 19, 2012

Morning Chaos

You know those days where you just want to throw in the towel?  Yeah, mine just happened and I haven't been awake for three hours yet.  Where to start...

Apparently something in our house is really interesting to moths, because we have had a record high amount of moths in our house lately.  I don't understand how they got in (I'm thinking under the screens in the windows), but they are huge.  Like three inches long huge.  Look at your index finger.  Now imagine that it's a moth.  I'm sure you can understand my frustration (and panic).  I know moths aren't bad and they are just like butterflies and they won't hurt anything.  I know that in my head.  But when I see something that huge flying around my house, I tend to panic.  I have killed four in the last 12 hours.  FOUR!  Four huge, radioactive, take over the world sized moths.  Gross.

Let's move on to the dog.  Don't be fooled.  She's the devil in disguise.  
Since we (basically) live in the desert, Charlotte gets really dirty from rolling around in the sand.  Also, I've noticed that she's shedding like crazy.  So (in my infinite wisdom) I decided to start my cleaning today by giving her a bath.  The bathrooms need to be cleaned anyway, so I figured I might as well get her out of the way and then clean the shower and tub after she is done.  I always dread giving her a bath because she HATES water.  Charlotte will not stay in the bathtub unless you have a death grip on her.  

All seemed to be going well in the beginning.  I put the two littles in front of the TV (not a norm, I promise) and gave Zander enough cereal in a bowl to keep him occupied.  Charlotte had gotten through two cycles of water and soap, rinse and repeat with minimal fuss.  I was finishing her up and getting the towel to dry her off and Zander opened the bathroom door.  I'm sure you can guess what happened.

Charlotte takes off down the hallway, shaking excess water off every five seconds (soaking the linoleum) and running towards the door outside.  I am running after her, trying to get the outside door open.  Zander is running after us, slipping and falling all over the floor, crying because he doesn't understand what's going on.  I get the door open (notice that there is yet ANOTHER moth inside the window screen) and everything seems to be okay.  Until Charlotte starts rolling in the sand.


Really dog?  I just spent a half an hour scrubbing and dumping water all over you and in five seconds you completely undo everything.  And add five floors that I need to mop.  And two screaming children.  Oh, Charlotte.  You really are the bane of my existence.  I love how good you are with the kids.  I love that you protect the house.  But you are really on my last nerve.  There is one and only one reason I don't give it up and just find a new home for her.


The kids love her.  And I love my kids.  I can't get rid of their dog.

I think she secretly knows this.  I think she knows that if she tolerates Calla pulling her fur out, Zander sitting on her and Gabe shooting her with his Nerf guns that she can get away with anything.  She is a sly one.  I wouldn't put it past her.  

That won't keep her from spending the day being locked outside though.  I refuse to let her have the last laugh.  So much for limiting my caffeine and sugar intake.  Cup of coffee #2 here I come.  Along with a sizable piece of chocolate angel food cake.


(Recipe break - This is a boxed angel food cake mix.  I just added four tablespoons of dark chocolate cocoa powder and instead of using 1 1/4 cups water, I substituted 1/4 cup of cooled coffee.  Mix and bake as directed.)

I definitely didn't think I would be having a battle of wills with the dog this morning.  And moths.  Don't forget the dang moths!

*If anyone has any advice or tips on how to get rid of these moths, I greatly appreciate it.  I'm thinking I might have to buy some moth balls and set them inside the window sill but am worried about the kids. 

Wednesday, April 18, 2012

Calypso Studios Inc. Product Review!

I was contacted about a month ago by Calypso Studios Inc. to test some of their new 2012 products.  If you have never heard of them, here's a short background:

Calypso Studios debuted it's business online in 2007 with fashion accessories and gifts.  Their most popular items include their "It's a Wrap Bracelets" (made of glass, clay, gold nugget or metallic beads), their eco-friendly, reusable and stylish S.H.O.P. totes (S.H.O.P. stands for Start Helping Our Planet) and most recently their Comforting Clay items (includes crosses, hearts, clips and bookmarks).  All their items are beautiful, well crafted, thoughtful and unique gift items and jewelry pieces.

I first heard about Calypso Studios from another blog (Pioneer Woman - "It's a Wrap Bracelet") and I was in love at first sight.  From there, I "liked" Calypso Studios on Facebook (you can too!) and Pinterest (click here!) and have been "following" them ever since.  I was overjoyed when I read they were asking for bloggers to test some of their new products and was even more thrilled when I received my four products in the mail!

God Bless America Clay Bracelet

This bracelet is made of clay beads that resemble the American flag and is strung on elastic.  It is a fantastic gift and accessory for anytime, not just the 4th of July.  I love that this bracelet is small enough for a child (tried on a three year old wrist) and didn't fall off, but still stretches to fit comfortably on the wrist of an adult too.


Patriotic Single Strand Wrap Bracelet

The single strand wrap bracelet is new this year to Calypso Studios and I love it!  This is by far my favorite product!  The cord is very durable (definitely held it's own at bath time with the boys) and the beads are delicate looking but very fashionable.  There are multiple colors you can buy the single strand wrap bracelet in and it makes the perfect accessory for someone like me that doesn't wear a lot of jewelry.  By far, the best feature of this bracelet is the double closure option.  There are two sizes you can make this bracelet.  I really appreciate that, since I have an extremely small wrist and normally have to pass on bracelets (they fall right off).  Also, I love the signature toggle bead.


Multi Color Neon Stretchy Keychain

Neon is making it's way back into the fashion world and finds a home at Calypso Studios.  This bracelet / keychain is perfect for people like me that have to dig through the black hole (aka my purse) every time I try to find my keys.  The elastic band is nice and stretchy to go around your wrist while still holding your keys.  Also, the key chain is easy enough to remove if you want to wear it as a bracelet.  And yes, it does glow under a black light.  Check out all their neon clay and glass beaded products!


Leila S.H.O.P. totes

Last but not least are the S.H.O.P. totes.  I love the idea of having reusable bags for groceries.  These totes come in a pack of three and are neatly wrapped up inside a smaller carrying case that clasps close.  This makes life so much easier as you have somewhere you can store the unused bags when you're done with them.  Also, I like that you can attach the bag to a purse or carry it around your wrist.  I always forget my reusable bags in the house or car, but by attaching it to my purse, I don't have to worry about remembering them.

Each individual tote also has clasps that fasten together, making the actual bags small and super portable.  When I unrolled one, I was surprised by two things.  First, how huge the totes are!  They are about double the size of a normal plastic grocery sack.  Then I noticed the colors and patterns.  These totes are gorgeous!  The colors are brilliant and I love the playful patterns.


*My wonderful friend, Ashley, was my model.  Thanks Ashley!

All in all, I am definitely impressed with the products I received and can't wait to order some for birthday and Christmas presents!  I highly recommend checking them out if you're looking for fashion-forward accessories and gifts!

Don't forget to check out Calypso Studios Inc. on:


Saturday, April 14, 2012

Family Easter photo shoot

I always try to come up with something creative for their holiday pictures, but as the day was wearing on and babies (Zander) were getting cranky I just decided to go with the back yard.  We have this stone wall all around our back yard to serve as a fence and these really annoying prickly plants that grow in the sand, but I thought they would serve as a cool texture element in the pictures.  It makes the pictures look bigger (I think).  In the ones where they are looking up, Matt was trying to entertain them with an Iron Man toy, but you can see where Zander was done sitting still.  I got a couple good ones of all three kids, but I'm really happy I was able to get some good close ups of Calla.  


I have Photoshop Elements 8 (that's how I edit almost all my photos) and used two separate actions on these pictures.  I highly recommend both of these websites, they have a lot of freebies and tutorials for Photoshop beginners.  I have basically learned everything I know about photography and photo editing from websites like these and trial and error.

I used the Mini Fusion action from MCP Actions.  This is a freebie, but she offers many different options for purchase for more advanced editing.  She also offers a Facebook templates for Photoshop.

I also used the Simply Vintage action from The Coffeeshop Blog.  I LOVE this website.  She offers multiple actions, frames, templates and tutorials (and more) for free!  All her information is very thorough, with screen by screen directions.  I can't say enough about this blog, a definite must bookmark for anyone starting out in the photography world (or just interested in learning new editing methods).

Thursday, April 12, 2012

First Easter

As far as Calla's first Easter went, I think it was a success.  She was the first of the kid's awake, smiling and happy as always.  I am so thankful for her smiles and cheerful attitude in the morning.  Her basket contained a bumble bee hand puppet, some new wash clothes and a bath book.  Calla was very happy to chew on the puppet and book.  While Zander took a nap (post-basket egg hunt), I got her dressed up and snapped a couple pictures.  I love taking pictures of her.  I know these moments (sitting in a basket, being propped up by a pillow and covered in plastic eggs) won't last long, so I'm glad I was able to capture a piece of the moment.  

These are my favorites:


Wednesday, April 11, 2012

BBQ ribs in a crockpot

In our busy life, I am constantly on the look out for new crock pot recipes.  Sometimes it's nice (even on non-busy days) to throw something in a crock pot and have dinner ready with minimal effort.  I have been having a hard time coming across new ideas (other than casseroles full of cream or soups or stews), so I decided to give ribs a try.  My family LOVES ribs.  I enjoy them, but don't have the time or inclination to slow roast them in an oven and baste them every 1/2 hour.  The crock pot sounded like the perfect solution.

Preparation:  

I set my crock pot to low about 5 minutes before I put the meat.  I also pulled the meat out of the fridge and had it warm up a little before putting it in the crock pot.  I've always heard that it's better for cooking if your meat isn't cold when it gets put in a slow cooker.  I used a full rack of pork baby back ribs and cut them in four sections.  Then I cut off the extra fat and rubbed them down with a BBQ mixture of spices.  I think I used a mix of chili powder, onion powder, garlic powder, salt and pepper.  You can use whatever you want, or look one up online.  It really doesn't matter too much.

Cooking:  

I put my rib sections around the edges (meat side against the pot) and had one section laying across the bottom of the cooker.  I also cut up a medium yellow onion and threw that in with the ribs.  You don't have to do that, I just like the flavor it gives the meat.  Then I put in a couple dashes of Worcestershire sauce over the whole thing.  With the temperature set to low, I cooked the meat (just like that, no liquid) for three hours.  I think I flipped the bottom section once half way through.


After three hours, I pulled everything out, set the ribs aside and drained the cooking liquid.  Then I put them back in (minus the onions) and dumped about a cup of BBQ sauce over the ribs.  You can use a premade BBQ sauce or make your own.  I just started experimenting after reading the label of one of our favorites and so far our family seems to like it.  The recipe for our sauce is at the bottom of the post.  I leave the meat to baste in the slow cooker on high (this time) for about another hour.  I feel like this just helps get the flavor of the sauce in the meat, not just coating it.

Put meat in.
Low for three hours.
Dump in BBQ sauce.
High for one hour.
(Had to recap)

I preheat the broiler (or oven to 500 degrees) and pull the meat out, put it on a foil covered baking tray.  I baste the meat with sauce and stick in the broiler (or oven) for 5 minutes, just long enough to get some color on the meat and a crust.

Pre-Broiler


I do the "in for 5 minutes, out and baste" a couple times and then pull them out for good.  Before I cut them up, I let them rest for about 10 minutes, give the juices a chance to absorb into the meat.

Finished product 


We like them.  The meat is usually pretty tender, easy enough for my six year old with one front tooth to bite off the bone.  It's becoming a favorite and much easier than doing it all in the oven.  You could even do the last part of basting on the grill.  I am all about good, low maintenance food that my family will eat.

Homemade BBQ sauce -

I like my sauce to be thicker, have more molasses and sweet. It doesn't have any of the tangy-ness of vinegar, like you would put on pulled pork with coleslaw.  BBQ sauce is like coffee, everyone likes it their own way.  If you don't like this recipe, it's okay (I'm not offended), you don't have to.  It works for us.  Play around with the flavors and make it your own.

This makes about 2 cups.
Which is around the amount you end up using for this recipe, plus a little extra to dip meat in at the end.

1 cup ketchup
1/2 cup molasses
1/2 cup brown sugar
1 tsp. garlic powder
1 tsp. chili powder
Salt and pepper to taste

Whisk these together and taste it.  If you want it sweeter, add more brown sugar or you can add honey.  If you want it spicier, add more chili powder or pepper.  If you want it tangy, add apple cider vinegar.

BBQ sauce is one of those things you can't screw up.  It might take you a little while (and you might end up with more than you need) but it's not as hard as it seems.  Give it a try!

Thursday, April 5, 2012

Coffee... my life blood

This post is in no way a paid advertisement for Keurig or any of their products.  They do not have any knowledge of my post.  The same goes for Starbucks.  I endorse them of my own accord.

I used to spend A LOT on coffee.  Going out and buying a cup of coffee for $4 every day times two (me AND Matt) got expensive very fast.  Before we knew it, our coffee habit got out of control.  Something something, caffeine addiction.  There's just something about having a cup of coffee the same way no matter which branch you go to, prepared exactly how you want it.  You can't get much like that.  Anyway, Matt and I decided it was time for a coffee intervention.  We had to do something about our out-of-control take-out coffee habit.  The problem was that we like our coffee completely different ways.  He likes coffee with his artificially-flavored french vanilla cream and sugar and I like my coffee plain and black.  He only drinks a cup in the morning.  I drink one in the morning, one around nap time and a cup of decaf at night.

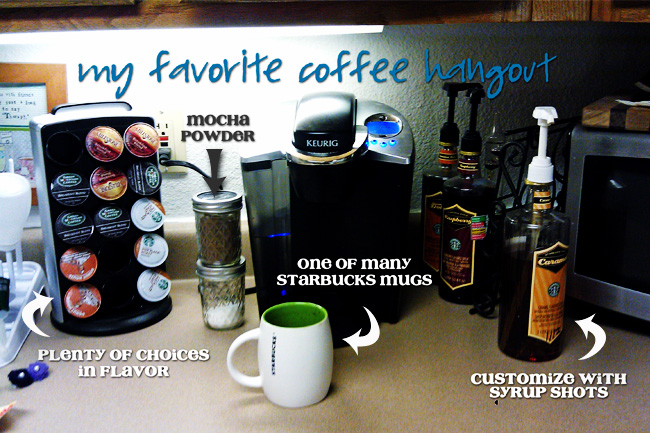
We finally found a solution to our problem.  And all our coffee woes ended with three shining blue lights where you select your brew size and a digital display that read "Ready to Brew".  


My Keurig.  I love my Keurig.  It has transformed so many aspects of my life.  It makes me happy to wake up in the morning.  It makes me jump out of bed and look forward to facing the day.  Okay, that's a little exaggeration.  A couple hours of more sleep would probably make me happier, but my Keurig definitely helps with my morning blues.  The individual brew cups are perfect for us to customize our coffee how ever we want it.  Matt can have the French Vanilla flavored coffee to take to work and I can have whatever else I want.  On top of it, I have begun expanding our flavor selections, making it more and more like a coffee shop at home.  You can buy any of the Starbucks syrups from the stores or their online store.  I have found their brand of syrup to be the best tasting with less funky aftertaste than other brands you can buy at the grocery stores.

Below are recipes I have made or found for coffee and creamers:

My Starbucks Rip-Off Mocha mix

2 tablespoons white sugar
1 tablespoon Dark Chocolate cocoa powder

Combine with small cup Keurig button (or for those of you that don't have a Keurig, about 6 oz or 1/3 cup) of brewed coffee or espresso and 1/3 cup warm milk.  Add more milk or less to your taste.

I like my mocha to be less sweet.  When I make the mix at home, I leave out one of the tablespoons of sugar, so I have equal parts of cocoa powder and sugar.  Then I add one pump of the Starbucks Raspberry syrup.  Other recipes I have found online say to add Caramel syrup to get the knock-off Salted Caramel Mocha.

Perfect Iced Coffee - from the Pioneer Woman
Her recipe makes 2 gallons that can be saved in an airtight container for up to a month.  I didn't want to have quite that much coffee sitting in my fridge (not that it wouldn't be consumed, mostly because I don't have the spare room) so I halved the recipe.

I took an empty rinsed out milk jug, filled it with water and poured it into my HUGE stock pot I use to boil my turkey brine.  Then I stirred in a half pound of coarsely ground Starbucks Blonde coffee.

*Side note on why it's coarse ground - I have a French Press (that I haven't used in forever) and this prep is very similar in brewing methods.  By having coarse ground coffee beans, you can soak the beans in the water to get all the flavor and oils you want but it makes it much easier to filter.  When you go to filter this brew, you won't have to worry about getting tiny particles floating in your coffee or sticking in between your teeth (happens to me often).

After stirring in the coffee with the water, I covered it with the stock pot cover and let it sit overnight.  The Pioneer Woman recommends eight hours minimum, overnight maximum.  Depending on how strong you want your coffee, let it brew longer.  It smelled divine.  When it was "brewed", I took my mesh strainer, lined it with two layers of paper towel (I don't have cheese cloth.  I don't even know where you buy cheese cloth other than Amazon.  Paper towel worked perfectly for me.  You just need something to catch the bean grinds so it doesn't end up in your coffee concentrate.  Coffee filters would work also.) and put that on top of my 4 cup pyrex measuring cup.

Then I began pouring and ladling my coffee brew into my mesh strainer, which filtered out the beans and poured into my measuring cup.  Once my paper towel was saturated, I just replaced it with two more paper towels.  When my measuring cup was full I poured that into a one quart mason jar.  This made four quart mason jars.  I stuck them all (minus one I gave to a friend) in the fridge to be consumed after fully chilled.

To go with this, I made a sweet cream creamer (similar to what the Pioneer Woman says at the end of her post).  This is a good general creamer.  Because the iced coffee is so strong (you really do need a full glass of ice to help cut the strength), I actually like adding this to my coffee.  I like that it has the subtle sweetness from the condensed milk.  You can't put regular sugar in iced coffee.  It won't melt and sweeten your drink.   If you haven't already tried it, I just want to warn you.  You'll get a big mound of sugar at the bottom of your cup.  It took me a time or two to figure that out.  If you don't want to use the condensed milk, you could use a cooled simple syrup (equal parts sugar to water, boiled until dissolved) in it's place.

Sweet Cream coffee creamer

1 can evaporated milk
1 can sweetened condensed milk

Mix the two together and store in an airtight container in your fridge.  Make sure to shake it before you add it to your beverage.

Drink and enjoy.  Even though it has caffeine in it, I feel like coffee is one of those drinks you can just sit back, relax and drink.  I think that's why I consume so much of it daily.  Having something I can enjoy how ever I want, whenever I want, makes me feel like I have some form of control over my chaotic life.  We do still visit Starbucks' while we're out and about, but being able to have the same comfort while sitting at home in my pj's and not worrying about the kids running wild... there's nothing like that.

Tuesday, April 3, 2012

Make Your Own: Hair clips and Hair clip wall fixture

I got this idea from a couple different links on Pinterest, but have altered it by using a shoe box instead of a picture frame or piece of cardboard.  I liked the idea of it being a box and sticking out from the wall.  So, to begin, I took one shoe box.  This is a smaller one, it had Gabe's soccer cleats in it.


The easiest way to do this would be if you have a box where the top and bottom are two separate pieces, but as you can see this isn't the case.  So I decided to cut off an extra piece from the back of the bottom piece so it would complete the top.  Kind of a confusing explanation, but you can see what I mean in the next picture.


See how I cut extra from the bottom piece to make the top piece a full four sided rectangle?  I used duct tape to secure all four sides.


I had a bunch of green felt left over from Christmas crafts and thought it would look cute for all my flower bows to have a green background.  So I measured out the sides and drew the cut lines on my green felt.


I cut all the sides a little long so they would overlap into the box, making it easier to secure with hot glue.


Then I went, side by side, and stretched my green felt up and over the edge, hot gluing the fabric at the bottom and inside the box.


I also hot glued the seams on the corners so there wouldn't be any cardboard showing through.


The covered box.


The next step was to measure out ribbon to attach the bows to.  I wrapped the ribbon inside the box and hot glued it in place.


I used three different sizes of ribbon (just for variety), but I recommend using a thicker ribbon.  You could also use thin felt strips in place of ribbon to hang your bows.  This is the finished product hanging on the wall.  I like how it sticks out from the wall.


Both the top and the bottom of the box, covered in green felt and wrapped in ribbons.  I chose to make the top hang vertically just to change it up.


Here are the majority of bows I have handmade.  I use a ribbon covered alligator clip to secure them to an elastic head band.  


These are the links I used to make my bows:

*This one I used the most.  I really like the felt bows that look like ribbon.  The original measurements make for a small bow, so I multiplied it by 1 1/2.

Three different types of flower bows

T-shirt fabric flower bow (not pictured)